Although I am a professional writer and blogger, although I keep up with the latest tech trends, although I am, might I say, something of a geek, I do not iPod. I don’t even iPhone. This is not a political nor even a religious position, it is simply the Way That It Is. When Microsoft released the Zune, I scoffed. Until one day, I sauntered past the Zune display at a local Mega-Duper-Mart and, out of the corner of my eye, caught a glimpse of a sight so hideously ugly, so repulsive in all its aspects, that I stopped dead in my tracks. The Brown Zune. Truly glorious in its ugliness, the Brown Zune features design that puts Soviet prison designers to shame – a squat, brick-like shape sheathed in a brown exterior whose ugliness is only increased by the green highlights when the light hits the device just so. I had to have one. And that dream came true one happy Christmas morn when I opened my present from my then-girlfriend – pure Brown Zuney goodness. To be honest, it’s not at all a bad media player. The desktop software is pretty good, if a little resource-hungry; the sound and video are great; the device’s interface is at least as good as any other media player’s interface (yes, including iPod’s) – all in all, I’m happy with my Zune. Except for one big thing. Although a firmware update some time ago added audiobook functionality to the Zune, in its infinite wisdom Microsoft decided they wouldn’t add it to the desktop software. Instead, Zune users need to use third-party software – Audible’s for Audible audiobooks, Overdrive for everything else – to transfer audiobooks onto the Zune. I am not an Audible member, so I haven’t really used their audiobook manager, but I do use Overdrive quite a bit. Unfortunately, it’s a little weird, especially when it comes to deleting audiobooks from your Zune. One thing neither Microsoft nor anyone else has seen fit to make easy, though, is how to get audiobooks from non-Audible and non–Overdrive sources onto your Zune. Maybe you have an audiobook on CD that you’ve checked out of your library, or one that you own. Because of licensing issues, it can be difficult and in some cases impossible to find those files online – and in any case, why should you re-purchase an audiobook you already have in your possession, just for the “privilege” of listening to it on your Zune instead of on 18 CDs? Now, you can rip the files and install them like any other music file, but you’d better listen straight through, because you won’t be able to resume playing from wherever you left off. You can also rip the files and edit the ID3 tags, setting the genre as”Podcast”, which will put all the files onto your Zune as a podcast, allowing you to stop and resume – but in my tests of this technique, the files came out in a random order that was useless. Since many audiobooks have tracks every 2 or 3 minutes, you can end up with hundreds of files for a long book, and searching every few minutes for the next one when you’re barreling down the freeway isn’t exactly a relaxing way to enjoy a book. Fortunately, there is a way to make the Overdrive audiobook manager work for you and, with a little work (not a lot) you can rip audiobooks to your Zune, and remove them, quite easily. Here’s how.
Using Overdrive with Overdrive Audiobooks
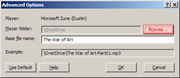
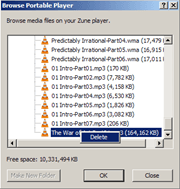
The Overdrive Media Console is used most often by libraries for handling DRM’ed, time-limited audiobook downloads for their clients. My library, for instance, offers audiobooks for a three-week “Checkout”, during which the title is unavailable to other patrons. It’s not the greatest thing ever, but it’s a fair-enough compromise between publishers and rights-holders who would prefer people buy books and libraries and their patrons who are committed to the free exchange of information. When you check out an Overdrive book, you download an ODM file to your hard drive which is opened by default with the Overdrive Media Console, which will download the actual book. Once it’s on your computer, you can listen to it in Overdrive, or transfer it to a device. To install it on your Zune, connect your Zune and then close the Zune software (which will probably open when your PC detects that the Zune is present). Now, simply select the book you want to transfer (unfortunately, Overdrive Manager cannot transfer multiple titles at the same time) and hit the “Transfer” button, which will open the Overdrive Transfer Wizard. The Transfer Wizard will find the Zune, then ask you which parts you want to transfer over—usually, you’ll select “All”, hit “Next”, and wait; when the files are all transferred over, click “Finish” to return to the Overdrive Manager. Deleting audiobooks you’ve already put on your Zune is… well, it’s weird. If you delete the book from the Overdrive Media Console window, it deletes it from your hard drive, but not from your Zune. So don’t do that. Instead, you want to select the book and, in a stunning break with intuition, click “Transfer” as if you were going to put the book on your Zune. Wait for the Zune to be detected, then deselect all of the parts of the audiobook in the Transfer Wizard. Hit “Next” and wait for the Transfer Wizard to do it’s thing – think of it as replacing the files that are on their with the no files you want. Hit “Finish” and the audiobook is gone from your Zune.
Creating Audiobooks from Your Own Mp3s
If you have your own audiobooks that you’d like to listen to on your Zune, you’re going to have to do a little prep-work, essentially fooling Overdrive into thinking you have an “official” Overdrive audiobook. You’ll use a couple of pieces of free third-party software to make this all work.
1. Rip the Audiobook
First of all, if the audiobook isn’t already converted to mp3, you need to rip the audiobook. I use CDex for this, although you can use any ripper, even the one built into Zune. To save space on your Zune, you can greatly reduce the bitrate from what you’d use for music – the spoken voice simply isn’t all that complex. 128k is more than adequate for most audiobooks – 64k will sound perfectly good, even. You can also rip in mono, cutting the file size in half. If your mp3 convertor has a setting to optimize for speech, use it – it will make sure that the least data loss occurs in the richest parts of the human voice.
2. Merge the Files into One Big File
This step is not strictly necessary, but when it comes time to delete files (see below) you’ll be glad you did it. Use an mp3 merging program – I like mergemp3, which is free and easy to use – to combine all of the files in your audiobook into one giant mp3 file. This is much easier to work with – some long books take up 25 or more CDs, each with 10, 20, or more tracks – that’s a lot to keep track of! Using mergemp3, you just select the folder where your files are, hit “merge”, select a file name and a place to save the file, and wait a few minutes. Make sure you save the file to its own folder – this will be important in step 3.
3. Create the Guide File and Transfer with Overdrive
Now you have a great big mp3, but you don’t quite have something the Zune will recognize as an audiobook. What you need is a WAX file, which is basically the meta-information that defines the mp3 (or mp3s if you did not merge them) as an audiobook. To create this, download the Zune Overdrive Wax Creator. Before you run it, tough, go online and find a picture of your book’s cover and save it in the same folder as your ripped audiobook (make sure it’s in JPG format). When you run the Wax Creator, it will immediately ask you to choose the folder where your audiobook’s files are stored. Find it, click next, and wait – the program will scan the folder, create a file listing all the mp3 files in the folder (which is why you want just the audiobook and the cover image in the folder), add the cover image, and open the Overdrive Transfer Wizard. Now, you can transfer the file just as you would any normal Overdrive audiobook.
Delete Audiobooks with Overdrive
So how do you delete your audiobooks? If you haven’t updated to version 3 of the Zune firmware, there’s a registry hack you an use to mount your Zune as a hard drive, allowing you to browse the directory structure and manually delete the files. This doesn’t work for people with up-to-date Zunes, though.
Header photo courtesy of yngrich via Flickr