This article is for those of us who want to look good and find ourselves frustrated by the never-ending quest for the perfect midsection.
What Exactly Do We Mean by Core Muscles?
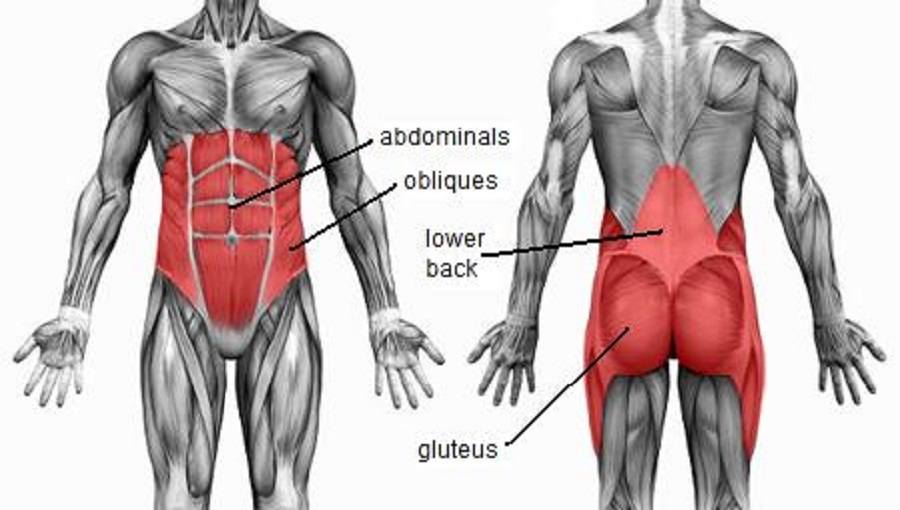
The abs (a.k.a. the abdominal muscles) are only a small fraction of your core muscles.[1] Your core is a complex series of muscles that includes your entire trunk region. It involves everything except your arms and legs. It is involved in almost every movement of the human body. The diagram below gives a general overview of the muscles that make up your core:
Having A Strong Core Isn’t Just for Looking Great. It Has Much to Do with Your Health!
Our core has three-dimensional depth and functionality. Many of the core muscles are hidden beneath the exterior musculature, underpinning everything you do. Here are a few health benefits of having a strong core:
It prevents back injury and eliminates back pain. Your core is your body’s stabilizer. Most back pain and injuries are caused by postural alignment problems[2] or poor posture. Poor posture is the result of weak lower back muscles.[3] A strong core is your spine’s best friend. It helps you perform everyday functions more efficiently and without pain. No matter where motion begins, it flows up and down the adjoining links of the chain – which is your core. Weak or inflexible core muscles can impair how well your arms and legs function. The ability to bend down to put on shoes, turn and look behind you, sit in a chair, take a bath, dress yourself, or simply stand still all heavily depend on your core. It improves posture. Weak core muscles contribute to slouching. Maintaining good posture is important because it lessens wear and tear on the spine and assists in your ability to breathe deeply. It improves athletic performance. Strengthening your core makes your workout more effective and efficient. A strong flexible core provides stability, prevents injury, and improves your range of motion. It improves physical appearance. Having a great physique isn’t and shouldn’t be the top reason for having a strong core, but it definitely is a motivator. A firm and flexible midsection makes you look taller, thinner, stronger, and more confident.
Common Core Myths You Need to Stop Believing
Now that you understand why having a strong, flexible core is important, you’re probably ready to hop on the floor and start banging out some crunches. Slow down tiger. Before you begin working on your abs let’s discuss some popular misconceptions on training your core.
Core strengthening exercises are the key to flat abs. Abs don’t come from the gym; they come from the kitchen.[4] The portion of the abs that are visible (or that you want to be visible) are hidden beneath a layer of fat. This means you have to reduce your body fat. This is done by exercising and by eating clean. Eliminate processed foods and follow this one simple rule: If you can’t pronounce it, don’t eat it. Sit-ups and crunches are the key to great abs. Huffington Post writer Ben Greenfield[5] gave the perfect illustration on why crunches are not only ineffective but harmful to your back over an extended period of time. He says,
Isolation exercises work best. Wrong! Your core is the body’s stabilizer and force transfer center and not a primary mover.[6] This means instead of doing hundreds of isolated exercises such as crunches or back extensions you should perform functional, compound movements like deadlifts, overhead squats, and pushups.
Best Core Exercises for Beginners
Now you know what your core is, understand how it functions, and are eating clean, it’s time to hit the gym! Below are some of the best core exercises for newbies:
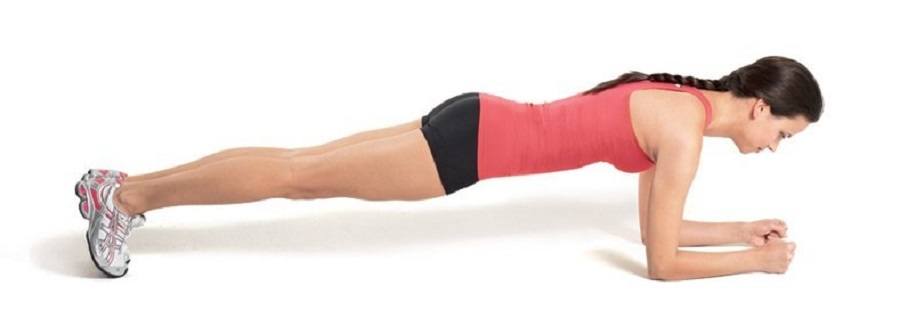
1. Low Plank
The plank is one of the best exercises you can do for your core because it builds isometric strength and helps sculpt your waistline and improve your posture. It is a 360 core toner, meaning that it targets the muscles all the way around the core. It also targets your glutes and shoulders. During this exercise remember to keep your breathing slow and controlled. Try to maintain a straight line from your head to your toes. How to:
Start in pushup position on the floor. Now bend your elbows 90 degrees and rest your weight on your forearms. Your elbows should be directly beneath your shoulders, and your body should form a straight line from your head to your feet. Hold the position for as long as possible being careful not to allow your hips to raise or sink. Try to maintain a straight line. Your goal should be to work up to holding it for two minutes.
Modification: Standard Plank form is a great modification for this move (remain in pushup position with hands positioned directly beneath your shoulders).
2. Bird Dog Crunch
Bird Dog Crunch strengthens the lower back and abdominals while improving balance and stability. The first tip in practicing Bird Dog Crunch is to make sure you are on a mat or soft surface. During the movement be mindful of your breathing. Inhale as you tuck under and exhale while extending your opposite arm and leg out. Make sure that as you extend your arm and leg you are tucking your belly button in to keep your back strong and stable. Also try and be as still as possible as you move. Don’t allow your back to move side to side. How To:
Kneel on the mat on all fours. Reach one arm straight forward, drawing in the abs, and extend the opposite leg straight behind you, keeping it in the air. Then bring the elbow and knee in towards your center. Try to get them to touch. As you round your back remember to draw in your abs. Repeat 10 reps then switch sides.
Modification: When extending your leg behind you allow, it to touch the floor.
3. Standing Bicycle Crunch
This move targets the obliques and rotational trunk muscles. It also improves balance and coordination. Because this is a standing move, it lowers the risk of neck strain and lower back injury. When preforming the Standing Bicycle Crunch be sure to keep your abs tight through out the entire movement. Also, this move should be performed in a slow and controlled manner. The slower you go the harder your abs work. How To:
Stand up straight with your feet shoulder-width apart and toes pointing forward. Place your fingertips behind your neck with your elbows pointing out to the sides, in line with your shoulders. Inhale and contract (tighten) your core. Raise your right knee up across the body as high as you can to your chest. Simultaneously twist your torso to the right and draw your left elbow toward the lifted knee so that you can feel the crunch. Exhale during the movement.
Modification: Perform the move with one hand against the wall.
4. Alternating Seated Leg Lifts
Seated leg lifts work your abdominals, lower abdominal region, pelvic muscles, and your hamstrings. When performing this move be careful not to hold your breath and try not to lean back to far. How To:
Sit on the floor, legs extended straight out in front of you. Keeping your core engaged, lean back slightly, so you’re able to place your hands on either side of your glutes. Take a deep breath and lift one leg six inches off the ground and hold for five seconds, and then put it down. Repeat with the other leg. Continue alternating for one minute, then rest for 20 seconds. Repeat for five rounds.
Modification: Alternate lifting your legs without stopping to hold.
5. Spider Plank Crunch
The Spider Plank Crunch is another 360 core exercise. It targets the entire abdominal region (upper and lower), the obliques, lower back, and the glutes. Try not to allow your hips to sink or raise when you are bringing your knee to your elbow. Also, fight to keep your body parallel at all times. How To:
Begin in a high plank or pushup position – hands directly underneath your shoulders, legs extended backward with your toes on the ground. Body is in a straight line. Lift your right leg and bring your knee toward the outside of your right arm. Return to plank position. Repeat the movement with the other leg. Do five reps on each side.
Modification: Begin in modified pushup position (both knees on the ground) and perform the move from your knees.
6. Modified Bicycle Crunch
This move targets the upper and lower abs, the obliques, and hip-flexors. It also targets the “posture muscles” and incorporates small amounts of balance. When doing this movement, remember to keep it smooth. The movement should be slow and controlled. Try not to jerk or over-twist your torso. Exhale when you crunch in and inhale on the extension. How To:
Start in a neutral sitting position. Your knees should be bent, heels flat on the floor and hands on either side of your head. Bring the right knee and left elbow toward one another, by gently twisting the torso. Repeat the motion on the other side. Alternate for 30 seconds, rest for 10 seconds, and repeat. Complete five rounds.
Modification: Place hands on the ground behind you instead of behind your head. Performing these exercises a few times a week along with small amounts of aerobic exercise and a proper diet will yield you a stronger core and a leaner, tighter torso. Featured photo credit: Sergio Pedemonte via unsplash.com

